

No products in the cart.
Are you tired of manually copying and pasting the same section of audio over and over again in Audacity? There’s a more efficient way to create seamless loops that can save you time and effort.
By following a few simple steps, you can easily loop sections of audio to create smooth, continuous soundtracks or repetitive beats. The process not only allows you to seamlessly loop segments but also gives you the flexibility to adjust and fine-tune the loop to fit your specific needs.
Whether you’re a music producer, podcast creator, or sound designer, mastering the art of looping in Audacity can greatly enhance your workflow and the quality of your projects.
Contents
hide
Key Takeaways
- Enable playback looping by clicking the Loop button in the Audacity interface.
- Refine the looping region by dragging it within the timeline and adjusting the in and out points.
- Position the looping region accurately by identifying repetitive patterns in the waveform and fine-tuning its position.
- Convert and edit the loop by splitting it into a separate clip, copying and pasting it, and using effects for further looping effects.
Enabling Playback Looping
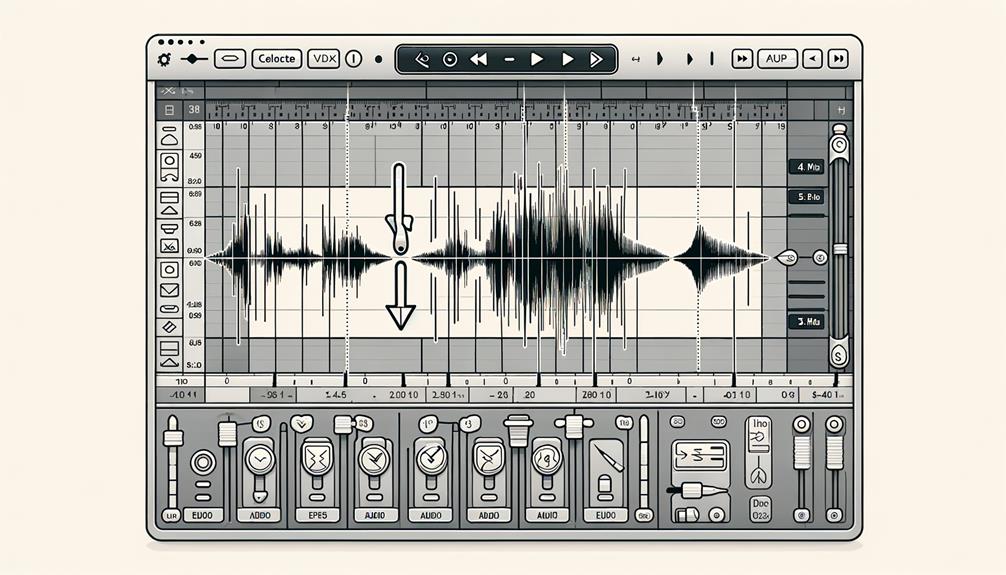
To enable playback looping in Audacity, simply click the Loop button in the interface. This action activates the looping feature, allowing you to seamlessly play a specific region of your tracks.
Once the loop is enabled, you can refine the looping region by dragging it within the timeline to your desired position. Additionally, right-clicking the timeline enables dragging selection, providing you with the ability to precisely adjust the in and out points of the looping region.
After customizing the loop to your satisfaction, you can press the Play button to initiate playback and listen to the loop seamlessly.
To further enhance the loop, you can zoom in to the waveform and set looping points at zero crossings, ensuring a smooth transition and removing any potential clicks or pops.
Audacity also offers a range of tools specifically designed for creating seamless loops, providing you with the means to fine-tune your audio and achieve professional results.
Identifying the Looping Region
When identifying the looping region in Audacity, you can look for repetitive patterns in the waveform to position the looping region accurately above the repeated part. This ensures that the loop sounds seamless and natural when played back.
Here are some steps to help you identify and adjust the looping region effectively:
- Click the loop button to enable playback looping and visualize the looping region in the timeline. This feature allows you to focus on specific parts of the audio and experiment with different looping regions, enhancing your creative process.
- Enable dragging for the looping region and adjust its in and out points individually to fine-tune its position. This level of control ensures that the loop region aligns perfectly with the repeated section, resulting in a smooth and continuous playback experience.
Converting the Loop to a Clip
After identifying and adjusting the looping region effectively, the next step involves converting the loop to a clip in Audacity. To do this, simply select the looped audio and right-click to split it into a separate clip. Once the clip is split, you can easily copy and paste it to reuse in your project as needed. This method allows for efficient reuse in different parts of the project, enabling seamless integration of the looped audio.
Utilizing the Effect menu, you can repeat the clip if necessary for further looping effects. This process enables the creation of a looping effect by repeating the clip in the desired sections of the audio. When converting the loop to a clip, it’s essential to ensure that the start and end points are precisely defined to maintain the seamless loop. Additionally, dragging the selection to fine-tune the loop and adjusting the format of the clip can further enhance the overall looping effect.
Exporting Loops
Consider utilizing the ‘Export as WAV’ option under the ‘File’ menu to export your loop, ensuring high-quality playback.
When exporting your loop, it’s crucial to maintain its seamless nature and quality. To achieve this, opting for a lossless format like PCM WAV ensures that the loop retains its original fidelity. Moreover, make sure to set the ‘Export Range’ to ‘Selection’ to export only the looped section, preserving its integrity.
When dragging the selection for export, ensure that the loop starts and ends at zero-crossing points to prevent any audio glitches.
It’s important to note that while compressed formats like OGG Vorbis can reduce file sizes, they may result in a loss of quality. Therefore, for the best playback experience, sticking to a lossless format like PCM WAV is recommended.
Accessing Online Loop Resources
To access online loop resources, search for websites such as ibeat.org and looperman.com. These platforms offer a wide range of audio loops in various genres and styles. When using online loop resources, it’s important to be mindful of the licensing terms, especially for loops available under Creative Commons, to ensure proper usage.
Here’s a comparison of the file formats commonly used for audio loops:
| Format | Description |
|---|---|
| WAV | An uncompressed audio format that provides high-quality sound and is widely supported. |
| OGG | A compressed audio format that maintains good quality and is often used for online streaming. |
| MP3 | A popular compressed audio format that balances quality and file size, commonly used for music distribution.
When you find the desired audio loop, simply drag and drop it into Audacity to seamlessly integrate it into your project. Utilizing these online resources can enhance your audio editing process and provide a diverse selection of loops to work with. Be sure to explore the wide array of options available on these platforms to fuel your creativity and experimentation with loops.
Frequently Asked Questions
How Do I Loop in Audacity?
To loop in Audacity, enable playback looping and adjust the region. Find repetitive parts, position the loop, and fine-tune it for seamless playback. Use Audacity’s looping capabilities for music production, podcast editing, sound effects, voiceovers, remixing, background music, storytelling, and meditation tracks.
How Do You Make an Audio Loop?
To create a seamless audio loop, position the looping region over the repetitive part. Fine-tune the loop duration and remove any clicks. Copy and paste the loop anywhere in your project for playback. Adjust the loop for compatibility and customization.
How Do You Repeat a Part in Audacity?
To repeat a part in Audacity, create seamless looping using looping techniques. Whether for music, podcasts, sound effects, or voiceovers, master looping basics for creative repetition. Perfect looped sections enhance your audio editing.
How Do You Repeat a Recording?
To repeat a recording in Audacity, create loops by adjusting the looping region and using fine-tuning tools for seamless audio repetition. Utilize looping options and controls for continuous loops, employing looping techniques and strategies.
Conclusion
Now you know how to loop in Audacity.
By enabling playback looping, identifying the looping region, converting the loop to a clip, and exporting loops, you can easily create and use loops in your projects.
Remember to fine-tune the loop by adjusting its in and out points, and using zero crossings to remove any clicks.
With these steps, you can make the most out of Audacity’s looping feature.


