Splice integrates with Ableton Live via a dedicated desktop app and the Splice Bridge plugin. Users download royalty-free samples, which are auto-synced to a local Splice Folder easily accessible in Ableton’s Browser. Splice Bridge allows real-time auditioning, time-stretching, and key-matching of samples before importing. This workflow eliminates redundant edits and keeps projects organized across devices. For advanced collaboration, Splice offers cloud-synced project management and version control—master these features for a seamless creative pipeline.
Key Takeaways
- Add the Splice Folder to Ableton Live’s Browser for instant drag-and-drop access to downloaded samples.
- Use the Splice Bridge plugin to preview and sync samples in real-time, matching Ableton’s tempo and key automatically.
- Organize and categorize samples within the Splice Folder for efficient search and seamless integration into Ableton projects.
- Cloud synchronization ensures all sample downloads and project changes are mirrored across multiple workstations and collaborators.
- Non-destructive sample manipulation via Splice Bridge preserves original files while enabling quick audition and editing within Ableton Live.
What Is Splice and How Does It Benefit Ableton Users
Splice functions as a cloud-based music creation platform, offering Ableton Live users access to an extensive repository of over one million royalty-free samples, loops, and presets.
By utilizing Splice samples, producers can streamline their workflow through direct integration with Ableton’s Browser via the Splice Folder, ensuring rapid auditioning and placement of sounds within sessions.
Splice Bridge, a dedicated VST3/AU plugin, further enhances this process by enabling real-time preview of samples matched to the host tempo and key, minimizing manual adjustment after import.
Users can also transpose and time-stretch within Splice Bridge, optimizing sample fit prior to commitment.
Splice’s cloud synchronization and collaborative features support efficient project management, ensuring all assets and Splice samples remain current and accessible across multiple workstations.
Installing the Splice App on Your Computer
Accessing Splice’s expansive library and integrating its workflow with Ableton Live requires proper installation of the Splice app on the user’s system.
To install Splice, download the Splice desktop app directly from the official Splice website. Follow the on-screen prompts to complete the installation process, confirming compatibility with the operating system.
Upon successful installation, launch the Splice desktop app. For peak workflow, verify that the default sample download path—typically Documents/Splice—is set to your preferred storage directory; this can be adjusted within the app settings for streamlined file management.
Keeping sample files organized in the designated Splice Folder guarantees efficient drag-and-drop integration with Ableton Live and other DAWs. Proper setup minimizes workflow interruptions and guarantees seamless access to Splice content during music production sessions.
Initiate the workflow by launching the Splice app and entering valid user credentials, or opt to create a free account if none exists.
Upon authentication, users gain immediate access to the Splice platform, featuring an extensive library of royalty-free samples, loops, and presets optimized for music production.
The user interface is engineered for streamlined navigation—browse, search, and audition samples directly within the app.
Utilize filtering and tagging functionalities to isolate specific genres, instruments, or BPMs.
For efficient management, leverage Splice’s organizational tools to create custom subfolders, ensuring faster retrieval and workflow integration.
The Splice Folder, typically located in the Documents/Splice directory, centralizes all acquired samples for consistency and ease of access when syncing with Ableton Live or other DAWs.
Downloading and Locating Your Samples
Once navigation of the Splice platform is established, efficient sample acquisition becomes the next step. Users should begin by downloading and installing the Splice app from the official website, following all installation protocols.
Upon launching the app, sign in or create a free Splice account to access the full samples library. Selecting and downloading desired samples is accomplished by clicking the download button adjacent to each sample, ensuring files are stored locally.
By default, all downloaded samples are deposited in the Documents/Splice folder, but this location can be customized in the app’s settings for workflow optimization. Maintaining a clear directory structure streamlines future integration processes.
It is critical to confirm that all sample downloads are complete and accessible within the designated Splice Folder for seamless project management.
Adding the Splice Folder to Ableton Live
Integrate Splice samples into Ableton Live by adding the Splice Folder directly to the software’s Browser Panel.
Start by launching Ableton Live and directing yourself to the Browser Panel, then select “Add Folder” under the “Places” section. Locate the Splice Folder—typically found in Documents/Splice—and confirm selection.
This workflow allows immediate access to all downloaded Splice samples and loops within Ableton Live, streamlining sample browsing and auditioning.
For advanced synchronization, leverage the Splice Bridge plugin to manipulate samples directly inside Ableton projects, enhancing real-time creative flexibility.
To optimize sample retrieval, users may pre-organize content into subfolders within the Splice Folder before adding it to Ableton’s Browser.
This technical setup guarantees efficient integration of Splice’s expansive content library with Ableton Live’s production environment.
Organizing and Accessing Splice Samples Within Ableton
To optimize sample management, users should implement a custom folder structure within the Splice directory before importing it into Ableton’s Browser.
This approach enables efficient sample categorization and rapid access during production.
With samples organized, the drag-and-drop workflow in Ableton Live streamlines placement into projects, minimizing interruption.
Custom Folder Structure
Efficient sample management hinges on a well-designed custom folder structure within the Splice Folder, allowing users to categorize samples by genre, instrument, or project for streamlined integration into Ableton Live.
Organization is optimized by creating subfolders tailored to personal workflow, enabling rapid navigation and minimized search times. Users should access the Splice Folder by adding it to the “Places” section in Ableton’s Browser Panel, ensuring instant availability of organized samples during sessions.
Saving all downloaded samples directly to this folder prevents missing files and maintains project integrity. Further, utilizing Ableton’s tagging and color-coding features enhances retrieval efficiency and visual clarity during production.
Regular updates to the folder structure accommodate evolving musical directions, sustaining an adaptive and efficient sample sourcing environment within Ableton.
Drag-and-Drop Workflow
Building on a robust custom folder structure, the drag-and-drop workflow streamlines the process of bringing Splice samples directly into Ableton Live projects.
Users should first add the Splice Folder to Ableton’s Browser via the “Add Folder” function under “Places,” enabling immediate access to all downloaded samples. For peak workflow efficiency, categorizing samples into subfolders by genre or type facilitates rapid retrieval during production.
The drag-and-drop workflow eliminates manual file imports, allowing users to insert samples straight from the Splice Folder into a session.
Integrating the Splice Bridge plugin further enhances this method by allowing in-context previewing, key and tempo matching, and real-time adjustments. Modifications such as time-stretching or pitch-shifting within Splice Bridge transfer directly, ensuring seamless creative continuity in Ableton.
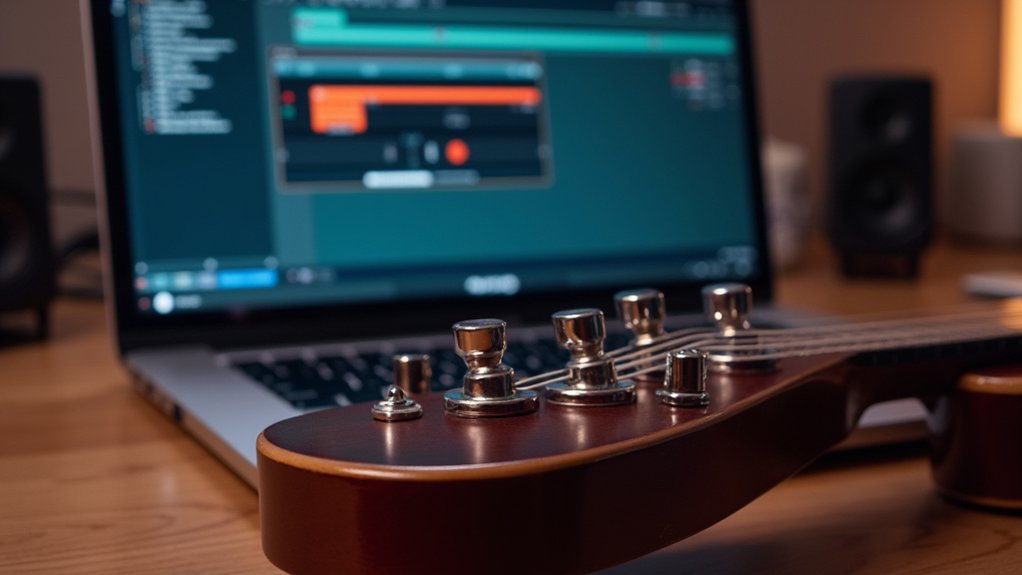
Using Splice Bridge for Enhanced Integration
Splice Bridge enables real-time sample auditioning directly within Ableton Live, syncing automatically to the project’s key and tempo.
This workflow guarantees harmonic and rhythmic alignment when previewing potential sounds, streamlining decision-making during production.
Users can efficiently test and select samples in context, minimizing manual adjustments and accelerating creative iteration.
Real-Time Sample Preview
Seamless sample auditioning is essential for a streamlined production workflow. Utilizing Splice Bridge, users can achieve real-time sample preview directly within Ableton Live’s environment.
By loading Splice Bridge as a VST3/AU on a MIDI track, instant communication is established between the Splice Desktop app and the DAW. This setup enables immediate auditioning of Splice samples in context, greatly reducing workflow interruptions.
The Transpose pane within Splice Bridge allows users to adjust sample keys efficiently, while the Timestretch window provides playback speed controls—normal, half, or double speed—for flexible rhythmic experimentation.
After auditioning and modifying samples to taste, users can drag the adjusted audio directly into Ableton Live, ensuring all pitch and timing edits are retained for further arrangement and processing.
Key and Tempo Matching
Once real-time sample preview is established, precise key and tempo matching becomes central to maintaining musical cohesion within Ableton Live projects.
Utilizing Splice Bridge, users achieve tight integration by syncing the Splice Desktop app’s playback settings directly to the DAW’s key and tempo parameters. This workflow guarantees harmonic and rhythmic compatibility when auditioning samples.
To optimize key and tempo matching, consider the following technical steps:
- Access the Splice Bridge Transpose pane to configure the sample’s key, aligning with the project’s harmonic context.
- Utilize the Timestretch pane to adjust playback speed, enabling real-time tempo synchronization at normal, half, or double rates.
- Experiment with key changes within Splice Bridge to test harmonic variations before committing samples.
- Copy and paste processed samples into Ableton, preserving all pitch and time modifications.
Transposing and Time-Stretching Samples With Bridge
Accessing advanced manipulation tools, producers leverage the Splice Bridge plugin to transpose and time-stretch samples directly within Ableton Live.
The dedicated Transpose pane in Splice Bridge provides efficient pitch-shifting, enabling samples to be transposed into the key of the DAW project for harmonic alignment. Producers can quickly audition samples in multiple keys, facilitating creative exploration and ensuring harmonic correctness within complex arrangements.
The Timestretch pane in Splice Bridge introduces granular control, offering playback rates at normal, half, or double speed. This empowers users to experiment with extreme time-stretching on vocal, melodic, or percussive content, revealing unique textures and rhythmic variations.
Utilizing these features, samples can be transposed and time-stretched non-destructively, preserving creative intent and workflow fluidity within Ableton Live’s production environment.
Proper installation of plugins in designated folders is vital for functionality, ensuring seamless integration and access within the DAW.
Copying Modified Samples Directly Into Your Ableton Project
Transferring modified samples from Splice Bridge into an Ableton Live project streamlines the production workflow by preserving all pitch-shifting and time-stretching adjustments made within the Bridge interface.
This process guarantees that samples retain their modified characteristics when integrated into a session, eliminating the need for redundant editing.
To execute an efficient copy modified sample operation, users should adhere to the following technical workflow:
- In Splice Desktop, locate the desired sample and use the + button to download; it will change to “Copy modified sample” after download.
- Apply any pitch or time modifications using Bridge’s controls.
- Navigate to Ableton Live, position the playhead or select a target track.
- Use cmd + V (Mac) or ctrl + V (Windows) to paste the processed sample directly into the arrangement.
This method maintains production flow and audio fidelity.
Optimizing Collaboration and Workflow Between Splice and Ableton
Efficient collaboration between Splice and Ableton Live hinges on real-time project syncing, robust version control, and automated sample management.
Users can leverage Splice’s instant update propagation and branching to minimize conflicts and maintain clear project histories.
Integrated sample organization further eliminates lost assets, ensuring seamless handoffs and reducing downtime in collaborative workflows.
Real-Time Project Syncing
Synchronizing projects between Splice and Ableton Live streamlines collaborative workflows by automating the upload and storage of samples and session files in real-time.
This real-time project syncing guarantees all contributors access the most current project state, minimizing manual file transfers and version confusion. Efficient collaboration hinges on maintaining workflow continuity and immediate update notifications.
To optimize this process:
- Enable Splice’s background application to automatically sync saves, reducing workflow interruptions during live sessions.
- Leverage in-app notifications to monitor project changes, allowing for prompt feedback and seamless collaboration.
- Verify all collaborators use the same versions of non-standard VSTs and plugins, as Splice flags missing dependencies to prevent compatibility issues.
- Regularly check Splice’s synced folder for the latest session files, guaranteeing no edits are missed during group production.
Version Control Benefits
Through utilizing Splice’s robust version control, Ableton Live users gain granular oversight of project evolution, enabling precise tracking of edits and efficient rollback to previous states as needed.
This thorough revision history empowers teams to experiment freely, as branches for alternative arrangements or genres can be created without risk to the main session.
Collaboration is optimized by real-time notifications, making certain all participants remain informed of project updates and edit histories.
Splice’s version control further streamlines workflow by managing dependencies—alerting users to non-standard VSTs and plugins integral to the session—thus preempting compatibility issues.
Automatic background syncing ensures all collaborators work with the latest files, minimizing data loss and confusion.
Collectively, these features establish a reliable foundation for seamless, professional collaboration within Ableton Live environments.
Streamlined Sample Management
Beyond the advantages of version control, Splice’s automated sample management system further optimizes collaborative workflows within Ableton Live.
By centralizing the handling and syncing of samples, Splice guarantees all project contributors access identical sound libraries, eliminating manual file transfers and version mismatches.
Integrated features, such as Splice Bridge, further streamline this process by enabling efficient previewing and modification of samples directly in context.
Practical sample management within Ableton Live can be enhanced by adopting the following workflow strategies:
- Organize samples into subfolders within the Splice Folder for faster retrieval in Ableton.
- Use Splice Bridge to audition and edit samples before importing, maintaining project context.
- Leverage instant sample syncing for seamless collaboration and reduced administrative overhead.
- Monitor update notifications in Splice for real-time project coordination and revision tracking.
Frequently Asked Questions
How to Sync Ableton and Splice?
Syncing Ableton and Splice involves adding the Splice Folder to Ableton’s Browser, ensuring the Splice app is updated, and using Splice Bridge for workflow efficiency. This facilitates streamlined Splice workflow and ideal sample organization within Ableton projects.
How Do You Sync Splice Samples?
Syncing Splice samples requires efficient Splice organization tips and sample management techniques, such as categorizing samples within the Splice Folder, utilizing Splice Bridge for key/tempo matching, and regularly updating software to streamline workflow and maintain seamless session integration.
How Do I Sync Samples in Ableton?
To sync samples in Ableton, users leverage precise sample management by importing files into the Browser, enabling automatic tempo matching via Warp mode. Efficient workflow includes organizing samples into folders and utilizing Ableton’s flexible time-stretching algorithms for seamless integration.
Is Splice Compatible With Ableton?
Splice is fully compatible with Ableton, offering workflow-enhancing features such as direct sample browsing, Splice Folder integration, and the Splice Bridge plugin. These Splice features streamline sample management and accelerate the Ableton workflow for efficient music production.
Conclusion
Seamless integration of Splice with Ableton Live streamlines sample sourcing, manipulation, and workflow efficiency. By configuring the Splice folder as a watch directory, users expedite access to downloaded content. Utilizing Splice Bridge facilitates real-time auditioning, transposing, and time-stretching within session context, while direct drag-and-drop functionality minimizes interruption. These practices enhance creative agility, support collaborative projects, and guarantee that sample management remains organized, making Splice an essential asset for Ableton-based production environments.